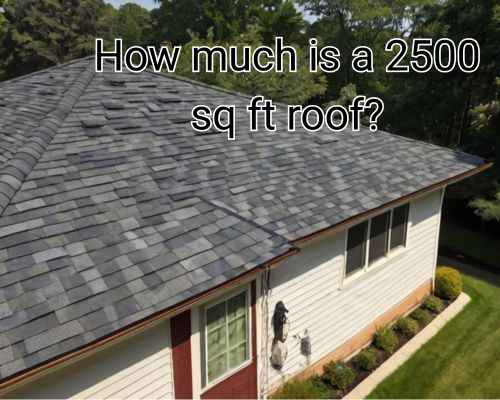
info@davidprenticebmw.co.uk

a stable roof worker

Is Roofing a Stable Job in New Jersey?

Roofing is an essential trade that provides vital services to homeowners, businesses, and property managers across the country. As people seek to ensure the durability of their roofs, skilled professionals in roofing are in high demand. But, with the ever-changing landscape of the job market, many individuals wonder: Is roofing a stable job? With CJ Commercial Roofing NJ, we will explore the stability of roofing jobs, particularly in New Jersey, USA, by considering key factors such as industry trends, demand for services, job prospects, and income potential.

a stable roof worker

The Roofing Industry in New Jersey

New Jersey, known for its diverse climate, urban centers like Newark and Jersey City, and rural landscapes in areas such as Sussex County, presents unique challenges and opportunities for the roofing industry. Roofing contractors in New Jersey handle a range of projects, from residential homes to large commercial buildings. The Garden State experiences varying weather conditions, with harsh winters, hot summers, and frequent storms. This fluctuating weather can lead to roof damage, creating a consistent demand for roofing services.

In addition to weather-related demand, New Jersey's real estate market is also a key driver of the roofing industry. The state's real estate sector, particularly in cities like Hoboken, Princeton, and Trenton, is robust, and as older properties require maintenance and repairs, roofing professionals play a critical role in ensuring the safety and security of these structures. As properties age, the need for roof replacements or repairs increases, making roofing a fundamental aspect of property upkeep.

High Demand for Roofing Services

The demand for roofing services in New Jersey has remained steady and, in many cases, growing. New Jersey’s geography, from its coastal areas along the Atlantic Ocean to its mountainous regions, exposes properties to extreme weather conditions. From hurricane-like winds to heavy snowfalls, the state’s climate frequently causes roof damage. This creates a constant need for roof repairs, maintenance, and installations, particularly in areas like Atlantic City and Asbury Park, where properties are more exposed to the elements.

Roofing professionals like in CJ Commercial Roofing NJ are essential for addressing these issues, ensuring that homes and businesses are structurally sound. New Jersey's coastal areas, including towns like Cape May and Long Beach Island, are highly vulnerable to storm damage, making roofing jobs even more important. For roofing contractors, the need for expert repairs and storm-proofing adds to job security.

Moreover, as urban development continues, the roofing sector is adapting to newer construction methods, including energy-efficient roofing systems and sustainable materials. This evolution creates opportunities for roofing professionals to stay ahead of trends, offering cutting-edge solutions to clients.

Job Stability and Growth in Roofing

The roofing industry in New Jersey offers a range of career opportunities, from entry-level positions to highly experienced roofers. The industry has a relatively low barrier to entry, with many roofing professionals starting as apprentices or laborers before advancing to journeyman status or running their own businesses. Roofers can specialize in various areas such as flat roofing, shingle roofing, or commercial roofing, increasing their job market flexibility.

Job stability in roofing is generally good. As long as properties require roofs, roofing professionals will be needed. In fact, according to the U.S. Bureau of Labor Statistics (BLS), the employment of roofers is expected to grow by 5% between 2021 and 2031, which is in line with the average for all occupations. This growth is largely attributed to the constant need for roofing repairs, replacements, and installations as properties age.

In New Jersey, roofers can take advantage of the state's real estate boom and ongoing development. Areas such as Jersey City and Hoboken, with their expanding population and evolving infrastructure, provide ample opportunities for roofing companies to secure contracts for both residential and commercial projects. Additionally, New Jersey's ongoing focus on sustainability and energy-efficient homes provides roofers with opportunities to specialize in green roofing solutions, further enhancing job stability.

Income Potential for Roofers in New Jersey

One of the key factors contributing to the stability of roofing jobs is the income potential. While the salary for roofers can vary based on experience, specialization, and location, roofing professionals in New Jersey tend to earn competitive wages. According to the BLS, the median annual wage for roofers in the U.S. was around $44,100 in 2021. However, in states like New Jersey, where the cost of living is higher, roofers can expect to earn above the national average.

For instance, roofers in New Jersey can earn anywhere from $50,000 to $70,000 per year, depending on their experience and location. Those who own their own roofing businesses or have specialized expertise in areas like green roofs or commercial roofing can earn significantly more. Highly experienced roofers or contractors working in areas with a high cost of living, such as Northern New Jersey or cities like Princeton, may also have higher earning potential due to increased demand and larger-scale projects.

In addition to their salary, roofers may receive benefits such as health insurance, retirement plans, and paid time off, especially if they work for established roofing companies. Those who are self-employed may enjoy more autonomy and flexibility, but they must also manage their own business expenses and client relationships.

Challenges in the Roofing Industry

While roofing can be a stable and rewarding career in New Jersey, like any job, it comes with its challenges. Roofers often face physical demands, such as working in extreme weather conditions, long hours, and the risk of injury due to the nature of the work. Roofing jobs require strength, stamina, and attention to detail. These factors can sometimes lead to burnout or higher turnover in the industry.

Furthermore, roofing companies in New Jersey, especially smaller businesses, may face competition from large contractors or nationwide companies. To remain competitive, roofing professionals must continue to refine their skills, stay updated on industry trends, and maintain strong customer relationships. This is where specialized knowledge, such as expertise in energy-efficient roofing or storm-proof solutions, can help roofing professionals stand out in the market.

Conclusion: Is Roofing a Stable Job in New Jersey?

Roofing is a stable and essential job in New Jersey, driven by the state's diverse climate, high demand for roofing services, and ongoing real estate development. The roofing industry offers competitive wages, job security, and career growth opportunities for both newcomers and experienced professionals. However, it is not without its challenges, including physical demands and competition in the market.

For those who are physically fit, skilled, and dedicated to staying ahead of industry trends, roofing offers long-term stability. Whether working for a roofing company or running their own business, roofing professionals in New Jersey can take pride in knowing that they are contributing to the safety and integrity of buildings throughout the state. If you are considering a career in roofing, New Jersey offers a vibrant and promising landscape for growth and success.

a new roof gutter downspout under work

How to Remove Gutter Downspout: A Step-by-Step Guide for Homeowners in Melbourne, Australia

Gutter downspouts are an essential component of your home’s gutter system, directing rainwater away from the roof and foundation to prevent water damage. Over time, however, downspouts can become clogged, damaged, or outdated, requiring removal or replacement. If you live in Melbourne, Australia, and are looking for a way to remove your gutter downspout safely and efficiently, with Steve Arnie of Gutter Cleaning Melbourne, will walk you through the process.

a new roof gutter downspout under work

Why You Might Need to Remove Your Gutter Downspout

Before jumping into the process of removal, it's important to understand why you may need to take this step. Common reasons for downspout removal include:

  • Clogs: Over time, debris such as leaves, twigs, and dirt can accumulate in the downspout, obstructing water flow. A severely clogged downspout may need removal for a thorough cleaning or replacement.
  • Damage: Downspouts can become cracked or corroded due to exposure to the elements, especially in Melbourne, where the fluctuating weather patterns can take a toll on exterior fixtures.
  • Upgrades: If you are upgrading your gutter system or want to install a new downspout material (like a metal downspout), removal of the old downspout is essential.
  • Improper Installation: If your downspout was poorly installed or positioned incorrectly, removing it and repositioning it may improve the effectiveness of your rainwater drainage system.

Tools You Will Need to Remove Your Gutter Downspout

To successfully remove your downspout, you will need a few basic tools. These include:

  • Ladder: To reach the downspout safely, especially if it is positioned high up on a two-story house.
  • Drill with screwdriver bits: For unscrewing fasteners or screws holding the downspout in place.
  • Hacksaw or pipe cutter: If the downspout is too long or needs to be cut, a hacksaw or pipe cutter is necessary.
  • Silicone sealant or caulk (if reinstalling or replacing): This will help seal the area once the downspout is removed.
  • Gloves: For protecting your hands from debris and sharp edges.

Make sure to work on a dry day when the weather is calm, as wet conditions can make climbing a ladder dangerous. The weather in Melbourne can be unpredictable, so it’s best to check the forecast before starting this job.

Step-by-Step Guide: How to Remove a Gutter Downspout

Step 1: Assess the Situation

Before you begin, evaluate the condition of your downspout. Is it clogged? Damaged? Or are you simply upgrading it? This will help determine how carefully you need to proceed. If the downspout is heavily clogged with debris, you may need to clean it out first before removal. In Melbourne, where the city experiences regular rain showers, you’ll likely encounter leaves and debris buildup, especially in the autumn months.

Step 2: Secure the Ladder

Set up your ladder in a stable position to safely reach the downspout. If your downspout is positioned on a two-story home, make sure your ladder is long enough to reach comfortably. Be cautious of the Melbourne wind, especially near the coast or in elevated areas, as strong gusts could make the ladder unstable. Never lean the ladder against the gutter directly, as this can cause damage.

Step 3: Disconnect the Downspout from the Gutter

Examine the top of the downspout where it connects to the gutter system. There should be fasteners or screws that hold the downspout to the gutter. Use your drill with the appropriate bit to remove these fasteners. Once loosened, the downspout should come free from the gutter system.

Step 4: Detach the Downspout from the Wall

In most installations, the downspout will be attached to the exterior wall of your house with brackets or straps. These should be unscrewed using your drill and screwdriver. In some cases, you may need to remove nails or pins that secure the brackets. If you encounter resistance, be gentle to avoid damaging the wall or the downspout itself.

Step 5: Remove the Downspout

With the fasteners and brackets removed, carefully pull the downspout away from the wall and the gutter system. If the downspout is difficult to remove, check for any additional fasteners or debris that might be obstructing the removal process. You may need to gently tap it with a rubber mallet to dislodge any stubborn sections.

Step 6: Cut the Downspout if Necessary

If the downspout is too long for removal, use a hacksaw or pipe cutter to trim it down to a manageable size. Be sure to cut slowly and evenly to avoid creating jagged edges that could cause injury. After cutting, remove any sharp edges by filing them down.

Step 7: Clean the Area

Once the downspout has been successfully removed, take the time to clean the area. Inspect the gutter for any debris or signs of damage. This is also an excellent opportunity to clean the gutters themselves, as well as check for any leaks or potential issues.

If you plan on installing a new downspout or making repairs, use silicone sealant to ensure the connections are water-tight. For Melbourne homeowners, this is especially important as the city experiences regular rainfall throughout the year. Ensuring a secure fit will help prevent future water damage.

For professional needs, just go to https://gutter-cleaning-melbourne.com.au/.

Tips for Melbourne Homeowners: Maintaining Your Gutter System

Living in Melbourne means you need to be extra diligent about maintaining your gutter system due to the city’s variable weather. Here are some tips to help keep your gutters and downspouts in good shape:

  • Clean gutters regularly: Especially in autumn when leaves from native Australian trees like the Eucalyptus and Oak fall frequently, cleaning your gutters every few months is a good practice.
  • Inspect after storms: Melbourne is known for its sudden storms, so it's essential to inspect your gutters and downspouts after heavy rainfall to check for blockages or damage.
  • Consider gutter guards: Installing gutter guards can help prevent debris from accumulating in your gutters and downspouts, reducing the need for frequent cleanings.
  • Professional help: If you’re uncomfortable with DIY projects, consider hiring a local professional in Melbourne for gutter maintenance and downspout removal or installation.

Conclusion

Removing a gutter downspout is a straightforward task that can be done by most homeowners in Melbourne, Australia, with the right tools and careful planning. Whether you’re replacing a damaged downspout, upgrading your system, or cleaning out debris, following these steps will ensure that your downspout is removed safely and effectively. Keep in mind the weather conditions and always use the necessary safety precautions when working with ladders. By maintaining your gutter system and ensuring proper downspout removal, you can prevent water damage and prolong the life of your home’s exterior.

Remember, Melbourne's diverse weather patterns can wreak havoc on gutters and downspouts, so regular maintenance and quick repairs are key to keeping your home dry and protected. Happy home improvement!

round guttering

How Do You Snake Out Gutters? A Melbourne Homeowner’s Guide to Gutter Cleaning the Smart Way

When the skies over Melbourne burst into their classic four-seasons-in-a-day performance, homeowners know the drill—clogged gutters are not just inconvenient; they’re a recipe for roof leaks, water damage, and garden-bed chaos. One of the most effective ways to prevent these issues is to snake out your gutters. But if you're asking, “How do you snake out gutters?”, you’re in good company. With Steve Arnie of Gutter Cleaning Melbourne, we will walk you through the process, share local tips tailored to Melbourne conditions, and ensure you’re using best practices that protect both your home and your sanity.

round guttering

Why Gutters Matter in Melbourne’s Climate

Melbourne's temperate oceanic climate means you're facing everything from autumn leaf dumps in Kew and Coburg, to torrential spring downpours in Berwick and Bayside. This climate dynamic makes regular gutter maintenance crucial.

Blocked gutters aren’t just an aesthetic nuisance. They contribute to:

  • Fascia and soffit damage
  • Roof rot and mould
  • Foundation erosion
  • Flooding in basements or subfloors (common in older Victorian-style homes in Carlton or Fitzroy)

Local professionals across Melbourne—see Steve Arnie of Gutter Cleaning Melbourne—consistently recommend homeowners snake out their gutters at least twice annually: after autumn and before spring.

What Does “Snaking Out” Gutters Actually Mean?

Snaking out gutters refers to using a flexible tool (similar to a plumber's drain snake) designed to clear clogs and debris buildup in downpipes and hard-to-reach gutter sections.

While leaf blowers and manual scooping work for surface debris, gutter snaking is especially effective when:

  • Downspouts are blocked by sludge or compacted debris
  • You can’t access the full gutter length
  • The blockage is deep within the downpipe

Tools You’ll Need to Snake Out Your Gutters

Whether you’re in leafy Eltham or coastal Brighton, here’s a Melbourne-appropriate checklist:

🛠️ Gutter Snaking Kit

  • Gutter auger or flexible gutter-cleaning snake (available at Bunnings Warehouse or Mitre 10)
  • Extension poles (for second-storey homes in suburbs like Templestowe or Doncaster)
  • Hose attachment (high-pressure nozzle preferred)
  • Protective gloves
  • Ladder with stabilizers (always prioritize safety)

Optional But Helpful:

  • Gutter scoop
  • Bucket or garden tarp for debris
  • Camera inspection tool for severe clogs

Step-By-Step: How Do You Snake Out Gutters?

1. Safety First

Use a sturdy ladder and ensure it's placed on a level surface. In wetter areas of Melbourne, like the Dandenong Ranges, slick surfaces can pose real risks. Have someone spot you if possible.

2. Inspect the Gutters

Before you even touch the snake, manually clear loose debris. Use a scoop to remove leaves, twigs, or bird nests (yes, even magpies love gutter real estate in the outer suburbs).

3. Insert the Gutter Snake

Gently feed the gutter snake into the downspout or the trouble area. Rotate slowly to break up sludge and clumps. For tight bends or U-joints (especially on heritage homes in Parkville), use short, controlled motions.

4. Flush With Water

Once the debris is broken up, use a hose with a high-pressure nozzle to flush the system. This helps push loosened material through to the stormwater system.

5. Check for Flow

Observe the downspout output. If water flows freely, you’re golden. If it dribbles or backs up, repeat the snaking process.

Local Tip: Melbourne’s Unique Gutter Challenges

Melbourne’s native flora—like eucalyptus trees and acacias—shed fine debris that compacts quickly. In suburbs like Heidelberg and Northcote, homeowners often deal with oil-rich leaves that clog faster than northern counterparts. A gutter mesh or leaf guard system can prevent repeat snaking.

Also, remember Melbourne’s urban wildlife: possums and birds commonly nest in gutters. Before snaking, check for signs of nesting to avoid distressing local fauna (and possibly violating wildlife protection laws).

DIY vs. Hiring a Pro in Melbourne

If you're not confident on a ladder or dealing with a stubborn clog, hiring a gutter cleaning service can be a smart move. Local companies often offer:

  • Camera inspections
  • Water flow testing
  • Pressure cleaning
  • Bi-annual maintenance packages

In areas with complex architecture—think Victorian terraces in East Melbourne or the multi-tiered roofs in Toorak—pros have specialized equipment for safer, more thorough work.

SEO BONUS: Related Questions Melbourne Residents Ask

✅ How often should I clean my gutters in Melbourne?

Twice a year minimum—ideally late May (post-autumn leaf fall) and mid-September (pre-spring storm season). Homes surrounded by dense trees may require quarterly checks.

✅ Are gutter snakes better than leaf blowers?

Different tools for different jobs. Leaf blowers remove surface debris; snakes handle deep clogs. Use both for comprehensive cleaning.

✅ Can clogged gutters affect my insurance?

In Australia, some home insurance policies may deny claims if property damage results from neglected maintenance like blocked gutters. Always check your PDS (Product Disclosure Statement).

Eco-Friendly Gutter Cleaning in Melbourne

Concerned about the environment? Good on you, mate. Consider:

  • Composting collected organic debris
  • Using rainwater tanks with filtered gutters
  • Installing water diverters to reduce runoff waste

These not only help Melbourne’s waterways but also support City of Melbourne sustainability initiatives.

Final Thoughts: The Smart Way to Handle Gutter Clogs

Snaking out gutters isn’t just another tedious chore—it’s proactive home care, especially critical in Melbourne’s leaf-heavy, rain-ready environment. By investing a little time (or calling in a pro), you’ll save thousands in potential water damage and preserve your home’s structural integrity.

So the next time you spot that tell-tale overflow or hear dripping where there shouldn’t be, you’ll know exactly what to do. No more wondering, “How do you snake out gutters?”—because now, you’ve got the tools, the know-how, and the local smarts to keep your home high and dry.

a home construction

What is Roof Called in Construction? A Comprehensive Guide for West Palm Beach Homeowners

When it comes to construction, the term “roof” might seem straightforward, but there’s more to it than meets the eye. Whether you’re building a new home in West Palm Beach, Florida, or looking to repair or replace your roof, understanding the specific terminology and components involved in roofing construction is essential. This article explores the key aspects of roofing terminology and provides insight into what the roof is called in construction, including the various elements that make up a roof and how they function.

a home construction

The Basics: What is a Roof in Construction?

In construction, a roof is the top covering of a building, providing protection from weather elements like rain, wind, sun, and snow. It serves as a protective barrier and contributes to the structural integrity of the building. Roofs are designed to manage water drainage, provide insulation, and offer durability, ensuring the safety and comfort of the occupants inside.

However, while the term “roof” refers to the top surface of a structure, the construction of a roof involves various parts that work together. These parts vary based on the type of roof being built, the materials used, and the climate conditions in a particular area. In West Palm Beach, Florida, where the weather can be both hot and humid, as well as subject to tropical storms, roofing systems are designed to withstand such environmental challenges.

Common Roofing Terms You Should Know

To understand what a roof is called in construction, it’s important to familiarize yourself with the different elements that make up a roof system. Here are the most common components of a roof:

1. Roof Deck

The roof deck is the base of the roofing system and typically consists of wood, metal, or concrete. It is the structural platform that supports all the other layers of the roof. In West Palm Beach, homeowners often choose a durable material that can withstand high winds and heavy rain, such as plywood or oriented strand board (OSB), which are common choices for roof decking.

2. Underlayment

Underlayment is a layer of material installed over the roof deck but beneath the shingles, tiles, or metal roofing. It acts as a secondary barrier against water infiltration and provides additional insulation. In a region like West Palm Beach, where rain is frequent, a high-quality underlayment made of felt or synthetic materials is vital for protecting against leaks.

3. Shingles or Roofing Material

The shingles or roofing material is the outermost layer of the roof. It is designed to shed water, protect the underlying structure, and contribute to the overall aesthetic appeal of the home. In West Palm Beach, homeowners may opt for asphalt shingles, clay tiles, or metal roofing, as these materials are not only durable but also suitable for the area’s tropical climate.

  • Asphalt Shingles: Commonly used in Florida due to their cost-effectiveness and ease of installation.
  • Clay or Concrete Tiles: Popular for their ability to withstand high temperatures and intense sunlight.
  • Metal Roofing: Increasingly favored for its durability and resistance to wind damage, especially during hurricane season.

4. Ridge

The ridge is the highest point of the roof, where the two sloping sides meet. It’s an essential part of the roof's structure, ensuring that rainwater flows toward the eaves. Roofing contractors in West Palm Beach focus on sealing the ridge effectively to prevent water from seeping into the roof system, especially during tropical storms and hurricanes.

5. Eaves

Eaves refer to the edges of the roof that extend beyond the walls of the house. They help to direct water away from the foundation and prevent water from pooling around the house. Properly designed eaves are especially important in West Palm Beach, where heavy rain can quickly lead to water accumulation around the foundation, causing damage to the property.

6. Soffit

The soffit is the underside of the eaves, and it serves both functional and aesthetic purposes. It helps with ventilation by allowing air to flow into the attic, which is crucial for maintaining the roof's integrity in areas with high humidity, like West Palm Beach. A well-ventilated attic helps prevent moisture buildup and the growth of mold.

7. Fascia

The fascia is a horizontal band that runs along the edge of the roof, typically attached to the rafters. It supports the gutters and helps to protect the roof from the elements. In Florida, where storms can be intense, the fascia provides a layer of protection against the wind and rain that can be detrimental to the roof's durability.

See https://starroofingcontractors.com/ for more.

Roofing Styles Common in West Palm Beach

Different roofing styles serve various architectural purposes, and the choice of roofing style can significantly affect the overall look and functionality of a home. Some of the most popular roofing styles in West Palm Beach, Florida, include:

1. Hip Roof

A hip roof slopes on all four sides, offering excellent stability and wind resistance. This is a popular choice in West Palm Beach, as it helps the roof endure strong winds during hurricane season. Its design allows for better water runoff, making it an ideal choice for tropical climates.

2. Gable Roof

A gable roof has two sloping sides that meet at a peak, forming a triangular shape. While this design is aesthetically pleasing and allows for better attic space, it is less resistant to wind damage compared to a hip roof. Gable roofs are still common in West Palm Beach, especially for homes that are not in high-risk hurricane zones.

3. Flat Roof

Flat roofs are often used in modern architectural designs and are popular for commercial buildings in West Palm Beach. These roofs are easy to construct and maintain, but they require proper drainage systems to prevent water pooling, which can lead to leaks and water damage.

How Roofs are Built in Construction

The process of constructing a roof involves several stages, and the materials used depend on the design and function of the roof. In West Palm Beach, roofing contractors take special care in choosing materials that are resilient to the intense sun, heavy rain, and hurricane winds that are common in the region.

  1. Initial Planning and Design Before construction begins, the roofing system must be designed based on the specific needs of the building. This involves selecting the appropriate materials, such as shingles, tiles, or metal roofing, and ensuring that the roof can withstand local weather conditions.
  2. Roof Deck Installation Once the design is finalized, the roof deck is installed. This forms the base for the rest of the roof system and is typically constructed from plywood or OSB.
  3. Underlayment Application The next step is to apply a layer of underlayment over the roof deck. This is an essential step to provide an additional waterproof barrier.
  4. Shingle or Tile Installation The final layer, consisting of shingles, tiles, or metal roofing, is installed. This step ensures that the roof is waterproof and structurally sound.
  5. Finishing Touches Additional components like the ridge, eaves, fascia, and soffits are added to complete the roof system. Proper sealing and ventilation are critical for ensuring the longevity of the roof, especially in the humid conditions of West Palm Beach.

For professional work, just go to https://starroofingcontractors.com/.

Conclusion

Understanding what a roof is called in construction and its components is essential for anyone involved in building, maintaining, or repairing a roof in West Palm Beach, Florida. From the roof deck to the shingles, each part plays a crucial role in providing protection against the elements and maintaining the structural integrity of your home. Whether you’re replacing your roof or building a new one, it’s important to work with experienced roofing professionals who understand the unique needs of homes in West Palm Beach, ensuring your roof is built to withstand the region's climate and weather challenges.

For homeowners in West Palm Beach looking to install a new roof or repair an existing one, it’s always a good idea to consult with local roofing contractors who specialize in the materials and techniques best suited for the area. By understanding the components of a roof and the terminology used in construction, you can make informed decisions that will ensure your home remains safe and protected for years to come.

Installing aluminum gutter on roof edge

Do Roof People Do Gutters? Unpacking Roof & Gutter Services in West Palm Beach, Florida

When homeowners in West Palm Beach, Florida start thinking about home maintenance, one odd but important question often comes up: “Do roof people do gutters?” It’s a simple question with complex implications, especially in a coastal climate where roofing and gutter systems are your home’s first line of defense against heavy rains, high humidity, and hurricane season.

Installing aluminum gutter on roof edge

In this article, we’ll explore the crossover between roofing contractors and gutter professionals, what services you can expect, how it applies to Florida homes (especially in Palm Beach County), and what to look for when hiring a contractor. Plus, we’ll cover how gutters and roofs work together and why proper coordination between these systems is vital in places like West Palm Beach.

Understanding the Overlap: Roofing Contractors vs. Gutter Installers

To get right to it: Yes, many roofing professionals do gutters, but not all of them. In fact, many roofing companies in West Palm Beach offer comprehensive exterior services that include gutter installation, gutter repair, and gutter guards.

Why the overlap? It’s all about synergy.

Your roofing system and gutter system are interconnected. Roofers understand how water flows off a roof and into drainage systems. Since improper gutter placement can damage fascia boards or cause water to pool, roofers are often the best people to design or retrofit gutter solutions that won’t compromise the roof’s integrity. See https://guttersofwestpalmbeach.com/.

Why It Matters in West Palm Beach, Florida

In South Florida’s tropical climate, with sudden downpours and hurricane threats, your roof and gutters need to be in perfect sync. West Palm Beach homes, especially those near Lake Worth Lagoon or along the Intracoastal Waterway, face serious water exposure. Mismanaged water runoff can cause foundation issues, mold, or even attract pests.

Here's why integrated roof and gutter solutions are particularly important in this region:

  • High Rainfall: West Palm Beach averages over 60 inches of rain annually.
  • Hurricane Exposure: Storm-resistant roofs and gutters are essential to prevent blow-offs and flooding.
  • Salt Air Corrosion: Choosing the right materials (like aluminum or stainless steel gutters) is key in coastal areas.
  • Architectural Variety: Tile, shingle, and flat roofs all require different gutter configurations.

So yes—your roofing contractor should understand gutters, especially in a place like West Palm Beach where weather extremes demand cohesive systems.

What Services Do Roof-and-Gutter Pros Offer?

If you’re hiring a contractor in West Palm Beach, you’ll want to look for these bundled services:

1. New Roof Installation with Gutters

Perfect for homeowners doing a full remodel or new construction. Coordinated installation ensures proper water shedding and aesthetics, see https://guttersofwestpalmbeach.com/.

2. Gutter Replacement After a Roof Job

Many times, when your old shingles come off, your gutters need attention too. A roofer can remove old gutters and install seamless new ones with drip edges and downspouts that match the new roofing materials.

3. Roof and Gutter Inspections

Some of the top roofing companies in West Palm Beach offer seasonal maintenance plans—including cleaning, inspection, and minor repairs for both systems.

4. Gutter Guard Installation

Because Florida is filled with foliage (hello, palm fronds and tropical debris), gutter guards can be a game-changer. Roofers often recommend and install mesh or metal guard systems to keep leaves out.

5. Emergency Repairs

Post-hurricane damage? A reputable roofing and gutter contractor in Palm Beach County will be licensed, insured, and ready to tackle both roof leaks and broken gutter segments quickly.

Choosing the Right Contractor in West Palm Beach

The sunshine, sea breeze, and HOA standards of Palm Beach County demand contractors who do it all—and do it well.

Here’s a quick checklist:

  • Licensing and Insurance: Florida law requires state licensing for roofing work.
  • Local References: Ask for client references in neighborhoods like El Cid, SoSo, or Northwood.
  • Gutter Experience: Look for a portfolio of gutter installs and ask if they use seamless aluminum or copper systems.
  • Storm Readiness: Do they offer hurricane straps, impact-resistant materials, and emergency services?
  • Eco-Awareness: With green building trends in Florida, ask about rainwater harvesting setups or eco-friendly roof coatings.

You might find these top-tier contractors listed under “roofing and gutter companies near West Palm Beach” or even “full-service exterior contractors.”

The Cost Factor: Is It Cheaper Together?

Bundling your roofing and gutter projects often reduces costs in two ways:

  1. Labor Efficiency: One crew, one timeline, less overhead.
  2. Material Synergy: The same supplier often gives bulk pricing for roofing tiles, underlayment, and gutter systems.

In West Palm Beach, expect basic gutter installation to range between $6 to $12 per linear foot, while roofing work varies significantly based on materials—asphalt shingles, clay tiles, or metal roofing all come at different price points.

Final Thought: It’s Not Just “Roof People”—It’s About Whole-System Thinking

If you're in West Palm Beach asking “Do roof people do gutters?”, the real question is:

“Who can help me create a water-management system that protects my home from South Florida’s extreme weather?”

The answer: A seasoned roofing professional who also understands gutters. In today’s home improvement landscape—especially in Florida—holistic service providers are not only more convenient, but smarter.

So yes, roof people do gutters—and if they don’t, it might be time to find new roof people.

Pro Tip for Locals:

Next time you’re walking past a home in Flamingo Park or Southland Park, glance up. The homes with clean soffits, no mildew streaks, and crisp roof lines? They’ve probably had both their roof and gutters maintained together. Coincidence? Not likely.

Ready to Take the Next Step?

Looking for a licensed roofing and gutter expert in West Palm Beach? Search for providers who advertise:

  • Seamless Gutter Installation West Palm Beach
  • Tile Roof and Gutter Replacement Palm Beach County
  • Hurricane Roof Inspection & Gutter Cleaning Services FL

Remember, don’t just patch problems. Plan systems.

a cabinet manufacturer doing cabinet installation

Do Cabinet Manufacturers Renovate Existing Cabinets or Only Install New Ones in Mornington, Australia?

When it comes to improving your kitchen or bathroom, cabinets play a pivotal role in enhancing both the functionality and aesthetic appeal of your space. Many homeowners in Mornington, Australia are often faced with the question: Do cabinet manufacturers renovate existing cabinets or only install new ones? With Leona Rodriguesi of Mornington Cabinet Makers, we’ll break down what cabinet manufacturers in Mornington typically offer and help you decide whether a renovation or installation of new cabinets is the best option for your home.

a cabinet manufacturer doing cabinet installation

Cabinet Renovation vs. New Installation: What’s the Difference?

Before diving into whether a cabinet manufacturer can renovate existing cabinets, it’s essential to understand the key differences between cabinet renovation and installation.

Cabinet Renovation involves updating and refurbishing your existing cabinets. This can include sanding, painting, replacing hardware, and refacing the cabinets to give them a fresh look without needing a full replacement. Renovating existing cabinets is often a more affordable and eco-friendly option since it repurposes the original materials.

New Installation, on the other hand, is the process of removing old cabinets and installing brand-new ones. This option gives homeowners the opportunity to select a completely new design, material, and layout, which may be necessary if the existing cabinets are damaged or outdated beyond repair.

Do Cabinet Manufacturers in Mornington Renovate Existing Cabinets?

The good news for homeowners in Mornington, Australia, is that many cabinet manufacturers offer both cabinet renovation services and new installations. Whether you want to breathe new life into your old cabinets or start from scratch, there are professionals in Mornington who can guide you through both options.

Renovating Existing Cabinets in Mornington

If your cabinets are structurally sound but simply lack the modern appeal, renovating them might be the best option. Cabinet manufacturers in Mornington often provide services such as:

  • Cabinet Refacing: This involves replacing the cabinet doors, drawer fronts, and hardware, while keeping the original cabinet boxes. Refacing is a cost-effective way to update the appearance of your cabinets without the need for a complete overhaul.
  • Painting or Staining: If you love the shape and structure of your cabinets but are tired of the color, repainting or restaining the wood can bring a fresh, updated look. Cabinet manufacturers often use high-quality finishes that provide long-lasting durability.
  • Replacing Hardware: Sometimes, simply swapping out old handles, knobs, and pulls can create a significant difference. A quick hardware upgrade is a simple yet impactful renovation that can change the overall look of your kitchen or bathroom.
  • Resurfacing and Sanding: If your cabinet doors are scratched, chipped, or have lost their luster, manufacturers can resurface or sand them, giving them a fresh finish that matches modern trends.

Benefits of Cabinet Renovation in Mornington

Renovating existing cabinets offers several benefits, especially for homeowners in Mornington looking for an affordable and efficient solution:

  1. Cost-Effective: Renovating your existing cabinets is often more budget-friendly than replacing them entirely. You save on the costs of materials and labor, especially if your cabinets are still in good condition.
  2. Preserving the Layout: If you’re satisfied with the current layout of your kitchen or bathroom, renovating your cabinets ensures that you won’t need to redesign the entire space. You can retain the structure you already know and love.
  3. Eco-Friendly: By opting for renovation over replacement, you reduce waste and contribute to more sustainable home improvement practices. This is an appealing factor for many environmentally-conscious homeowners in Mornington.
  4. Faster Turnaround: Cabinet renovations typically take less time than full installations. With renovations, you won’t need to wait as long for your cabinets to be ready, allowing you to enjoy your updated space sooner.

When Should You Opt for New Cabinet Installation in Mornington?

While renovating existing cabinets can be an excellent solution for many homeowners, there are situations where new installation might be the better choice. If any of the following apply to your situation, new cabinets might be the right option:

  • Structural Damage: If your cabinets are significantly damaged, such as with rotting wood or broken frames, they might not be worth renovating. In these cases, new installations will ensure you have durable, reliable cabinets for the long term.
  • Complete Redesign: If you're looking to change the layout of your kitchen or bathroom completely, new cabinet installation gives you the flexibility to create a new design that meets your needs.
  • Outdated Cabinets: Some older cabinets might not be able to be renovated in a way that brings them up to modern standards. For example, if your cabinets are too small, inefficient, or no longer in style, installing new ones could provide a much-needed upgrade.
  • Increased Storage Needs: If your existing cabinets do not meet your storage needs, installing new cabinets with more advanced features such as pull-out drawers, pull-down shelves, or custom organizational solutions may be the best route.

For professional needs, just go to Leona Rodriguesi of Mornington Cabinet Makers.

How to Choose the Right Cabinet Manufacturer in Mornington

If you’ve decided that cabinet renovation or new installation is the right choice for you, the next step is finding the right cabinet manufacturer in Mornington, Australia. Here are some tips to guide you:

  1. Look for Experience: Choose a manufacturer with experience in both cabinet renovation and new installations. This ensures they can offer you the best solution for your specific needs.
  2. Check Portfolios: Ask for examples of past projects to get a sense of the company’s design style and craftsmanship. Many manufacturers will provide case studies or photos of previous work.
  3. Read Reviews: Research local reviews and testimonials from previous clients in Mornington to learn about their experiences with the manufacturer’s services and quality.
  4. Request a Quote: Get multiple quotes from different manufacturers to compare pricing and services. This will help you understand what’s within your budget.
  5. Discuss Your Vision: Be sure to communicate your ideas clearly. Whether you’re interested in a complete cabinet renovation or want to install new cabinets, a good manufacturer will work with you to achieve your vision.

Conclusion: Renovate or Replace? The Best Choice for Your Cabinets in Mornington

The decision of whether to renovate existing cabinets or opt for new installations depends on several factors, including the condition of your current cabinets, your design preferences, and your budget. In Mornington, Australia, many cabinet manufacturers offer both options, so you can choose the path that aligns with your needs. Renovating your cabinets can be a cost-effective and eco-friendly choice, while installing new cabinets may be necessary if your current ones are beyond repair or you’re looking for a complete redesign.

By carefully considering your options and working with an experienced manufacturer in Mornington, you can transform your space and create the kitchen or bathroom of your dreams. Whether you choose to renovate or replace, a professional cabinet manufacturer will guide you through the process, ensuring you achieve the best results.

Focused hands measuring with precision

What’s the Typical Deposit Required for a Cabinet Project in Mornington, Australia?

Planning a cabinet project for your Mornington home is an exciting venture—whether you’re renovating your kitchen, upgrading your bathroom storage, or fitting out a new laundry space. However, one of the most common questions homeowners ask before signing any contracts is: what’s the typical deposit required for a cabinet project? Understanding the financial commitments, including deposits and payment milestones, is essential to making informed decisions and avoiding costly surprises.

Focused hands measuring with precision

With Leona Rodriguesi of Mornington Cabinet Makers, we’ll explore the standard deposit ranges for cabinet projects in Mornington, factors that influence these upfront costs, industry best practices, and what to expect when working with local cabinet makers.

Understanding the Standard Deposit for Cabinet Projects in Mornington

In Mornington and greater Victoria, it’s common practice for cabinet makers and custom joiners to request a deposit before commencing work. This upfront payment typically secures materials, labor, and design services. For most residential cabinet projects in Mornington, the typical deposit ranges from 10% to 50% of the total project cost, depending on the size and complexity of the job.

Factors That Determine the Deposit Amount:

  1. Scope of the Project
    Small-scale jobs—like a bathroom vanity replacement—may only require a 10–20% deposit. In contrast, a full custom kitchen fit-out might require 30–50% to lock in bespoke materials, appliances, and trade schedules.
  2. Custom vs. Modular Cabinets
    Custom-built cabinets require more up-front investment as materials are ordered and cut to exact specifications. Expect higher deposits for these one-off solutions.
  3. Materials & Finishes
    Premium finishes like high-gloss acrylics, natural timber veneers, or engineered stone benchtops often require sourcing from specialized suppliers, necessitating higher initial costs.
  4. Reputation & Terms of the Cabinet Maker
    Established cabinet makers in Mornington, such as Peninsula Cabinets or Bayside Joinery, may have slightly different deposit policies based on their workflow and overhead structure. Some may offer flexible payment plans, particularly if they’ve worked with you before or come recommended by a designer or builder.

What Do You Get for the Deposit?

Paying a deposit isn’t just about locking in your spot in the schedule—it sets the foundation for the entire project. In Mornington’s competitive home renovation market, a deposit typically covers:

  • Detailed onsite measurements and 3D design consultations
  • Procurement of raw materials (like MDF, melamine, laminates, and hardware)
  • Scheduling and reserving installation slots
  • Ensuring custom components (doors, benchtops, drawers) are manufactured to spec

In essence, it allows your cabinet maker to begin the physical and logistical preparations required to deliver your cabinetry on time.

Typical Cabinet Project Costs in Mornington

To put the deposit into perspective, it helps to understand the average cost of cabinet installations in the Mornington Peninsula region. As of 2025, typical pricing in Mornington falls into these brackets:

  • Small Cabinet Project (e.g., laundry or ensuite): $2,500 – $5,000
  • Mid-Range Kitchen Cabinets: $10,000 – $20,000
  • High-End Custom Kitchens: $25,000 – $50,000+

Thus, a deposit on a mid-range kitchen might fall between $3,000 and $10,000, depending on the materials and timeline.

Local Regulations and Consumer Protections

If you're investing in cabinetry work in Victoria, it’s essential to understand your consumer rights. Under Consumer Affairs Victoria guidelines, for projects over $10,000, a written domestic building contract is legally required. Furthermore:

  • Licensed builders must provide a certificate of domestic building insurance
  • Deposits must not exceed 10% of the total cost if the project is worth more than $20,000 (unless special-order materials are involved)
  • Clear documentation should outline the payment schedule, warranties, and scope of work

Working with licensed and insured cabinet makers ensures your deposit is protected under Victorian law and gives you peace of mind throughout the renovation process.

Choosing a Cabinet Maker in Mornington: What to Look For

Mornington is home to a variety of skilled cabinet makers and joiners who specialize in kitchen renovations, laundry upgrades, and bespoke furniture design. When choosing a provider, consider the following:

  1. Local Reputation – Check Google Reviews and platforms like Houzz for customer testimonials. Names like Mornington Cabinetry Co., Custom Edge Cabinets, and Peninsula Joinery frequently appear with strong reviews.
  2. Portfolio of Work – Ask to see photos or walkthroughs of completed projects in areas like Mount Eliza, Dromana, or Frankston.
  3. Clear Deposit Terms – A reputable cabinet maker like Mornington Cabinet Makers will provide a clear quote and contract with outlined payment milestones—typically:

    • 10–50% Deposit
    • 40% Progress Payment (once manufacturing begins)
    • Balance Upon Completion

  4. Inclusions – Make sure quotes include soft-close hinges, drawer runners, benchtops, and installation. Ambiguity can lead to unexpected extras later.

Tips for Managing Your Cabinetry Budget in Mornington

Cabinetry is one of the most significant investments in any home renovation. Here’s how to keep your finances in check while securing the best result:

  • Get Multiple Quotes – Prices and deposit expectations can vary significantly. Three to five quotes will give you a good benchmark.
  • Clarify Payment Stages – Ensure each payment milestone matches a tangible phase (e.g., design finalization, manufacturing, installation).
  • Avoid Paying in Cash – Always use traceable payment methods and get receipts.
  • Review Contracts Carefully – Pay attention to deposit clauses, cancellation terms, and any mention of delays or material shortages.
  • Negotiate When Possible – Some cabinet makers may offer discounts or alternative payment terms, especially during the off-peak season.

Final Thoughts: Planning with Confidence

So, what’s the typical deposit required for a cabinet project in Mornington, Australia? The short answer: it varies, but expect somewhere between 10% and 50%, with most mid-sized projects leaning closer to 30%. Understanding how your deposit fits into the broader project timeline—and being aware of your legal protections—can help you approach your renovation with clarity and confidence.

Mornington locals looking to enhance their living spaces with high-quality cabinetry should always seek trusted professionals, transparent quotes, and contracts that reflect fair deposit structures. Whether you're in the heart of Mornington or in surrounding suburbs like Mount Martha or Somerville, investing in custom cabinetry adds lasting value to your home—starting with that first deposit.

Properly sealed and aligned gas lines

What is the Lifespan of a Gas Pipeline? A Warragul Homeowner’s Guide to Long-Term Safety and Infrastructure

When it comes to household infrastructure in Warragul, Victoria, gas pipelines are often out of sight and out of mind—until there’s a leak, an inspection, or a renovation project. But just how long do these critical systems last? What is the lifespan of a gas pipeline? Understanding this can save homeowners thousands in repairs, avoid hazardous situations, and ensure your home remains compliant with Australian safety standards.

Properly sealed and aligned gas lines

With Dean Owens of Plumber Warragul, we’ll explore the average lifespan of gas pipelines, the factors that affect longevity, common signs of wear, and why regular inspections in regional areas like Warragul and West Gippsland are so important.

Average Lifespan of a Gas Pipeline: Materials Matter

The expected lifespan of a gas pipeline primarily depends on the material used, the quality of installation, and environmental conditions.

1. Galvanised and Black Iron Pipes

  • Average Lifespan: 30–50 years
  • These were commonly used in homes built before the 1970s. While durable, they are prone to corrosion, especially if exposed to moisture underground or within poorly ventilated spaces.

2. Copper Gas Pipes

  • Average Lifespan: 40–60 years
  • Copper is corrosion-resistant and still used in Australian homes. However, acidic soil or water can speed up deterioration, especially in areas with high rainfall like Warragul.

3. Plastic (PE or Polyethylene) Pipes

  • Average Lifespan: 50–100 years
  • Commonly used for modern installations, PE gas lines are corrosion-resistant, flexible, and better suited to Warragul’s shifting soil and semi-rural terrain.

Each type of pipeline has its own advantages, but none are immune to degradation. Knowing the type of gas line installed in your property is the first step toward ensuring its integrity over time.

Local Factors That Influence Gas Pipeline Durability in Warragul

Living in Warragul, Victoria, presents some unique environmental challenges and advantages that directly impact gas pipeline longevity.

Soil Type

Warragul’s volcanic red soils are rich in minerals but can hold moisture for long periods. Constant exposure to moisture accelerates corrosion in metal pipelines, particularly older ones made of galvanised steel.

Weather Conditions

The temperate oceanic climate brings consistent rainfall and moderate humidity. Fluctuating temperatures, particularly during cold winters and warm summers, can cause thermal expansion and contraction, stressing pipe joints and materials.

Tree Roots and Landscaping

Properties in leafy parts of Warragul, such as near Brooker Park or Western Park, often feature large trees. Over time, tree roots can intrude on underground pipelines, causing cracks or dislodging pipe sections.

Signs Your Gas Pipeline May Be Failing

Warragul homeowners should be proactive in identifying early warning signs that a gas pipeline is reaching the end of its lifespan:

  • Unexplained gas smells in or around the home
  • Higher-than-normal gas bills with no change in usage
  • Visible corrosion on exposed pipes (common in garages or basements)
  • Low gas pressure during peak usage
  • Dead vegetation patches above gas lines
  • Hissing sounds near pipe joints or gas meters

If you notice any of these signs, contact a licensed gas fitter immediately. Professionals based in Warragul or Drouin are familiar with local soil, pipe types, and council regulations, ensuring safer inspections and repairs.

For professional needs, just go to Dean Owens of Plumber Warragul.

Australian Gas Safety Standards: What You Need to Know

Australia has stringent standards for gas installations, governed by AS/NZS 5601.1:2013, which outlines general gas installation guidelines. All gas pipelines—whether in residential homes, commercial buildings, or rural properties near Warragul South or Nilma—must meet these codes to ensure safe operation.

Local councils and utility companies, like Multinet Gas or APA Group, typically provide timelines for replacing older pipelines, especially if there are systemic issues reported in a neighbourhood. Warragul has seen infrastructure updates over the years, but older properties may still have outdated systems requiring upgrades.

Regular Maintenance and Inspection: A Small Investment for Long-Term Safety

Even if your gas pipelines were installed relatively recently, it’s wise to have them professionally inspected every 5 to 10 years. Licensed plumbers in Warragul can pressure-test gas lines and check for small leaks using industry-standard diagnostic tools.

In regional Victoria, rural properties or acreage blocks often have longer gas lines due to larger land sizes. These extended pipelines are more prone to environmental wear and should be checked more frequently—especially if crossing driveways, tree roots, or near livestock fencing.

Regular maintenance ensures compliance, preserves home value, and protects occupants from potential dangers such as gas leaks or explosions.


Pipeline Replacement: When Is It Time?

Sometimes repairs are no longer enough. If your home was built in the 1950s or earlier and still has original pipes, it might be time to consider a full pipeline replacement. The upfront cost is a worthwhile investment compared to the risk of property damage or carbon monoxide poisoning.

In Warragul, a gas pipeline replacement can cost anywhere from $2,000 to $5,000, depending on property size, pipe length, and accessibility. Fortunately, many local tradespeople offer free quotes and gas compliance certificates upon completion.

Be sure to hire someone with experience working in West Gippsland homes, as regional properties often present unique excavation and compliance challenges.

Final Thoughts: Plan Ahead, Stay Safe

So, what is the lifespan of a gas pipeline? It could be anywhere from 30 to 100 years, depending on materials and conditions. But for homeowners in Warragul and surrounding suburbs like Drouin, Yarragon, and Longwarry, local soil, climate, and vegetation make regular inspection an essential part of property maintenance.

Keeping your pipeline infrastructure up-to-date ensures not only your family’s safety but also adds to the value of your home, especially in a growing region like West Gippsland, where new buyers are increasingly safety-conscious.

Whether you're renovating a Federation-style home near Queen Street, building on a new estate near Lillico, or managing a rental property near Sutton Street, staying on top of your gas pipeline’s condition is a decision that pays dividends for years to come.

Bonus Tip for Warragul Residents

If you’re unsure about your gas system’s age, check your property’s building records or request a gas compliance history from Energy Safe Victoria or your local council. It’s a small step that could prevent a major headache down the road.

Need a Gas Fitting Expert in Warragul?

Contact licensed professionals like West Gippsland Plumbing Services or Warragul Gas & Plumbing for inspections, testing, and certified replacements. Many offer same-day service and are familiar with the needs of local homes.

If you’re asking, “What is the lifespan of a gas pipeline?”, now you know—it depends. But with the right knowledge, regular inspections, and a reliable local expert, you can extend your pipeline’s life and sleep soundly at night knowing your home is safe.

A plumber carefully inspecting a gas line for leaks

How Do You Check a Gas Pipeline? A Comprehensive Guide for Homeowners in Warragul, Australia

Gas pipelines are an essential part of many homes and businesses in Warragul, Australia. Whether you're heating your home or using gas for cooking, it's crucial to ensure your gas pipeline is in optimal condition to prevent potential hazards. Gas leaks and faulty pipes can be dangerous, leading to risks like fire, poisoning, or explosions. With Dean Owens of Plumber Warragul, we’ll explain how to check a gas pipeline, the signs to watch for, and the steps you should take to ensure your gas line is safe and functioning properly.

A plumber carefully inspecting a gas line for leaks

1. Signs You Need to Check Your Gas Pipeline

Before diving into the methods for checking your gas pipeline, it’s important to know when it’s time to inspect the system. Here are some signs you should look out for in your Warragul home or business:

  • Smell of Gas: A strong, unpleasant odor similar to rotten eggs is one of the most obvious signs of a gas leak. If you notice this smell, do not ignore it.
  • Hissing Sounds: If you hear a hissing sound near the gas line, it could indicate a leak or damage to the pipe.
  • Dead Plants: If the soil around your gas pipe appears to be discolored or plants are wilting, it might indicate a slow leak.
  • Increased Gas Bills: A sudden spike in your gas bill without a change in usage might be a sign of a leak.

If you notice any of these signs, it’s time to check your gas pipeline to ensure safety.

2. How to Check a Gas Pipeline: Step-by-Step Guide

Checking a gas pipeline can seem like a daunting task, but with the right tools and knowledge, it’s an achievable process. Here’s how to do it safely:

Step 1: Turn Off the Gas Supply

Before inspecting any part of your gas pipeline, always start by turning off the gas supply. This is essential for your safety. Most homes in Warragul have a gas meter located outside, typically near the gas main entry point. Locate the gas valve and turn it off to prevent any gas from flowing while you inspect the pipes.

Step 2: Visually Inspect the Gas Pipes

Once the gas is turned off, visually inspect the gas pipes for any visible damage. Look for cracks, rust, or corrosion, especially near connections or joints. If you find any visible damage, this could indicate a problem with the pipeline that requires professional attention.

Step 3: Check for Gas Leaks Using Soapy Water

One of the simplest and most effective ways to check for a gas leak is by using soapy water. Here’s how:

  1. Mix water with a small amount of dish soap to create a solution.
  2. Using a sponge or spray bottle, apply the soapy solution to the gas line, particularly around connections, joints, and fittings.
  3. If bubbles form at any point, it indicates a gas leak.

This method can help detect small leaks that might otherwise go unnoticed. However, it’s important to note that this test only detects leaks on the surface, so if you suspect a deeper issue, it’s best to consult a professional.

Step 4: Monitor the Gas Meter

For a more thorough check, monitor your gas meter for any changes. With the gas supply turned off, note the meter reading. Then, wait about an hour or so and check the meter again. If the reading has increased, it’s a clear sign of a gas leak somewhere in the system.

3. When to Call a Professional Plumber in Warragul

While DIY checks are helpful, there are situations where it’s best to call in an expert. If you detect any of the following, it’s time to contact a licensed plumber in Warragul:

  • You notice a gas smell that doesn’t dissipate after a few minutes.
  • The soapy water test reveals bubbles, indicating a leak.
  • You’re unsure about how to turn off the gas or need assistance with the inspection.
  • There’s visible corrosion, rust, or damage on the pipes that you cannot address yourself.

Professional plumbers in Warragul, such as those experienced in gas pipeline maintenance and repair, will have the expertise and tools needed to detect and fix more serious problems like faulty gas lines, broken connections, or even underground leaks.

4. How Gas Pipeline Inspections Contribute to Safety

Regular inspections of your gas pipeline not only help prevent leaks and accidents but also contribute to overall safety. In Warragul, Australia, homeowners and businesses must adhere to strict safety regulations to avoid any risks related to gas usage. Performing regular inspections can:

  • Prevent Dangerous Leaks: Gas leaks can be hazardous, causing fire, explosions, and poisoning. Regular inspections ensure that any leaks are detected and repaired before they become serious.
  • Ensure System Efficiency: Well-maintained pipelines improve the overall efficiency of your gas system, reducing energy consumption and lowering gas bills.
  • Increase Property Value: Homes and businesses with properly maintained gas systems are more attractive to potential buyers and tenants, which can increase your property’s value.

5. Safety Tips for Gas Pipeline Maintenance in Warragul

Maintaining your gas pipeline is vital for long-term safety and efficiency. Here are some tips to keep in mind:

  • Schedule Regular Professional Inspections: Even if you perform regular DIY checks, have a professional plumber inspect your gas pipeline at least once every two years to ensure everything is in working order.
  • Use the Right Equipment: Always use proper equipment when handling gas lines. For instance, avoid using matches or any open flames when inspecting pipes.
  • Be Mindful of Tree Roots: In Warragul, tree roots can sometimes interfere with gas pipelines. Ensure that trees or shrubs are not growing near your gas lines to avoid potential damage.

For professional needs, just visit https://plumberwarragul.com.au/.

6. Conclusion

Knowing how to check a gas pipeline is essential for homeowners and business owners in Warragul. Regular inspections help prevent dangerous leaks and ensure that your gas system remains safe and efficient. By following the simple steps mentioned above, including using soapy water, visually inspecting the pipes, and monitoring your gas meter, you can spot potential issues before they escalate. For serious concerns, don’t hesitate to contact a licensed plumber in Warragul to ensure your home or business is safe from the dangers of a gas leak.

Remember, safety is key when dealing with gas pipelines—don’t take chances.

A roofer inspects the gutter system to ensure no blockages are present

How Much to Replace Guttering on a 3-Bed House in Melbourne, Australia?

When it comes to maintaining your home, replacing the guttering is a crucial aspect that often gets overlooked. The guttering plays a vital role in directing rainwater away from your home’s foundation, preventing water damage and ensuring the longevity of your property. If you live in Melbourne, Australia, and are wondering, "How much does it cost to replace the guttering on a 3-bed house?" With Steve Arnie of Gutter Cleaning Melbourne, we will help you understand the factors that influence the cost and provide you with an average estimate.

A roofer inspects the gutter system to ensure no blockages are present

Understanding the Importance of Guttering

Before we dive into the cost, it’s important to understand why guttering is essential for your home. Guttering collects and directs rainwater from the roof to downpipes, ensuring that water does not accumulate around the foundation. Without a well-maintained gutter system, water can seep into the walls and foundation of your home, causing expensive damage over time. In Melbourne, where rainfall can be unpredictable, having a functional gutter system is even more important to protect your investment.

Average Cost to Replace Guttering on a 3-Bed House in Melbourne

The cost to replace guttering on a 3-bedroom house in Melbourne can vary significantly based on a few key factors, such as the size of the house, the type of materials used, and the complexity of the installation. On average, you can expect to pay anywhere from $2,000 to $5,000 for a full gutter replacement on a standard 3-bedroom house.

Factors Influencing the Cost of Guttering Replacement

  1. Type of Guttering Material One of the main factors that will influence the cost of replacing your guttering is the material you choose. There are several types of materials available, each with its own price range. The most common materials used for guttering in Melbourne include:
    • Colorbond Steel: Known for its durability and rust resistance, Colorbond steel is a popular choice in Melbourne. Expect to pay around $40 to $50 per metre for Colorbond guttering.
    • PVC: PVC is a more affordable option and can cost between $20 to $30 per metre. However, it may not be as long-lasting as steel, especially in areas prone to extreme weather.
    • Aluminium: Aluminium gutters offer a good balance between cost and durability. Prices typically range from $30 to $40 per metre.

    Keep in mind that the more durable materials, like Colorbond steel or aluminium, will come with a higher upfront cost but may save you money in the long term due to their longer lifespan and low maintenance requirements.

  2. Size and Layout of the House The size of your home will also play a significant role in the overall cost. A larger 3-bedroom house with a more complex roofline will require more guttering material, which will increase the cost of replacement. For example, a single-storey home will generally cost less to replace the guttering than a two-storey home due to the difficulty and time involved in accessing the gutters. Additionally, the number of corners, bends, and downpipes required will affect the price. Houses with more intricate roof designs will require more time and labour, resulting in higher costs.
  3. Labour Costs Labour costs in Melbourne for gutter replacement can vary depending on the company you hire and the scope of the work. On average, you can expect to pay between $40 to $60 per hour for a professional to install your new guttering. The labour cost will increase if the installation is more complex or requires additional work, such as removing old gutters or repairing any damage to the roof or fascia.
  4. Removal of Old Guttering In some cases, you may need to factor in the cost of removing and disposing of your old guttering. This can add an extra $500 to $1,000 to the total cost, depending on the amount of material to be removed and the complexity of the job.
  5. Additional Features Some homeowners opt to add extra features to their guttering system, such as leaf guards, which can prevent leaves and debris from clogging the gutters. While leaf guards can save you on maintenance costs in the future, they typically cost an additional $10 to $15 per metre to install.

How to Save Money on Guttering Replacement in Melbourne

If you're looking to save money on replacing your guttering, here are a few tips:

  • Get Multiple Quotes: It’s always a good idea to get quotes from several different guttering companies in Melbourne to ensure you’re getting the best deal. Be sure to compare both the material costs and the labour charges.
  • Consider DIY: If you have experience with home repairs, you may consider replacing the guttering yourself. However, this is not recommended unless you have the necessary skills and equipment, as improper installation could lead to costly damage down the road.
  • Opt for Basic Materials: While it may be tempting to go for high-end materials, opting for more affordable options like PVC may help reduce the upfront cost. Just be sure to weigh the long-term benefits of more durable materials before making a decision.

For more, just visit https://gutter-cleaning-melbourne.com.au/.

How to Choose the Right Guttering Company in Melbourne

When choosing a guttering company in Melbourne, make sure to:

  • Check Credentials: Ensure the company is licensed and insured. This will give you peace of mind knowing that the work will be carried out to a high standard.
  • Look for Experience: Opt for a company with years of experience in guttering replacement. Experienced professionals will know how to handle different types of homes and guttering materials.
  • Read Reviews: Online reviews and testimonials can provide insight into the quality of a company’s services. Be sure to check platforms like Google and Facebook for reviews from past clients.
  • Get a Detailed Quote: Always ask for a detailed quote that includes both materials and labour costs. This will help you avoid any hidden fees later on.

Conclusion

Replacing the guttering on a 3-bedroom house in Melbourne can cost anywhere from $2,000 to $5,000, depending on factors like the material chosen, the size of the home, and the complexity of the installation. While it’s important to consider the cost, don’t forget the value of investing in quality materials and professional installation to protect your home from water damage in the long term. By comparing quotes, considering DIY options (if appropriate), and opting for durable materials, you can ensure that you’re making the best decision for your home and your budget.

A freshly installed roof with sleek lines and a polished finish

How Much Does It Cost to Replace 500 Sq Ft of Roof in New Jersey?

If you're a homeowner in New Jersey, one of the most important questions you may face is how much it will cost to replace a roof. Whether you're dealing with an aging roof or weather-related damage, understanding the costs involved in replacing a 500 sq ft roof is crucial for your budget planning. With CJ Commercial Roofing NJ, we’ll dive deep into the factors that influence roof replacement costs and give you a better idea of what to expect in terms of pricing, based on current market conditions in New Jersey.

A freshly installed roof with sleek lines and a polished finish

Understanding Roof Replacement Costs in New Jersey

The cost to replace a roof can vary greatly depending on several key factors. These include the type of roofing materials you choose, the complexity of the installation, labor costs, and the location of your property. When it comes to New Jersey, the state’s diverse weather conditions, such as heavy snowfalls in winter and hot summers, can have a significant impact on the type of roofing materials you might need, as well as the frequency of roof replacements.

Cost Breakdown for a 500 sq ft Roof Replacement:

  • Labor Costs: Labor costs in New Jersey for roofing projects typically range from $50 to $100 per hour, depending on the experience of the roofing contractor. For a 500 sq ft roof replacement, labor costs could make up about 40% of the total price. The amount of time required for the job will also depend on the type of roof and its complexity.
  • Material Costs: Roofing materials vary widely in price, and your choice will play a large role in determining the overall cost. Here are a few common types of roofing materials and their approximate costs per square foot:

    • Asphalt Shingles: The most popular roofing material in New Jersey due to its cost-effectiveness. On average, asphalt shingles cost around $3 to $5 per square foot. For a 500 sq ft roof, this would total between $1,500 and $2,500.
    • Metal Roofing: Known for its durability and energy efficiency, metal roofing typically costs between $6 and $12 per square foot. For a 500 sq ft roof, this translates to $3,000 to $6,000.
    • Wood Shingles or Shakes: These are generally more expensive, ranging from $7 to $10 per square foot. For a 500 sq ft roof, you can expect to pay between $3,500 and $5,000.
    • Tile Roofing: While tile roofs are aesthetically pleasing and durable, they can be quite costly. Tile roofs usually range from $10 to $15 per square foot, which would amount to between $5,000 and $7,500 for a 500 sq ft roof.

  • Additional Costs: In addition to the base costs for labor and materials, you may also face additional fees for things like removing the old roofing material, disposing of the debris, and any unexpected repairs or adjustments needed during the replacement process. On average, these additional costs can add anywhere from $500 to $1,500 to the total price.

Factors Influencing the Cost of Roof Replacement

Several factors can influence the final price of replacing a 500 sq ft roof in New Jersey:

  1. Roofing Material Selection: As discussed earlier, the type of roofing material you choose plays a big role in determining the cost. Asphalt shingles tend to be the most affordable, while tile or metal roofs can be more expensive but offer longer lifespans and additional benefits like energy efficiency.
  2. Roof Pitch: The pitch or slope of your roof can significantly impact the cost of installation. Roofs with a steep pitch require more time and effort to install, which increases labor costs. Additionally, the risk of working on a steep roof can add to the overall expense.
  3. Accessibility: The ease of access to your roof can also affect the price. If your roof is difficult to access due to trees, neighboring buildings, or other obstructions, contractors may need to use special equipment, which can drive up labor costs.
  4. Location within New Jersey: Costs for roofing projects can vary depending on where you live in New Jersey. For example, areas like Jersey City and Hoboken may have higher costs due to their proximity to New York City and the higher cost of living in urban areas. On the other hand, more rural parts of the state may have lower labor and material costs.
  5. Roofing Contractor Experience: The experience and reputation of your roofing contractor will also impact the cost. While experienced contractors may charge more for their services, they can offer better quality work and quicker turnaround times, which might save you money in the long run.

For professional needs, just visit https://cjcommercialroofingnj.com/.

Seasonal Considerations for Roof Replacement in New Jersey

The time of year you choose to replace your roof can also affect the cost. In New Jersey, the busiest roofing season typically falls between late spring and early fall. During this time, demand for roof replacements is high, and contractors may charge premium prices for their services.

Winter months, on the other hand, can be less expensive due to a decrease in demand. However, roof replacements during winter can present challenges due to freezing temperatures and inclement weather, which may delay the work and increase costs for both labor and materials.

How to Save on Roof Replacement Costs

If you're looking to save on your roof replacement project in New Jersey, here are a few tips:

  1. Get Multiple Quotes: Always obtain several quotes from different roofing contractors to ensure you're getting the best deal. Prices can vary significantly between contractors, so it’s important to shop around.
  2. Schedule During Off-Peak Season: If possible, schedule your roof replacement during the off-season, such as winter or early spring, when contractors are less busy and may offer discounts.
  3. Consider Material Alternatives: While asphalt shingles are the most affordable option, you might want to explore other cost-effective materials that still offer durability and aesthetic appeal, such as metal or composite shingles.
  4. Maintain Your Roof Regularly: Regular maintenance can help you avoid costly repairs and extend the life of your roof. Simple tasks like cleaning gutters and inspecting for leaks can prevent major damage and lower your replacement costs in the long term.

Conclusion: What to Expect for a 500 Sq Ft Roof Replacement in New Jersey

In summary, replacing a 500 sq ft roof in New Jersey can cost anywhere between $2,000 and $7,500 or more, depending on factors like roofing materials, labor, and location. The most affordable option is typically asphalt shingles, while more durable and aesthetically pleasing options like metal, wood, or tile can cost significantly more.

By understanding the variables that affect roofing costs and shopping around for the best deals, you can make an informed decision and ensure that your roof replacement is both cost-effective and high quality. Make sure to work with a trusted roofing contractor who has experience in New Jersey's diverse weather conditions and is familiar with the types of roofs that work best for your home.

With the right preparation, you can protect your home with a new, reliable roof that will last for years to come.

TOP -